Make sense of the world
We were talking previously about how awesome computers are at reconfiguring themselves to do different things. This was manifest in pins on the microcontroller that we could change the behavior of through software.
What we were lacking in this model though, something that we possess, is a sense of memory (regret, if you must). Our programs so far forget things as soon as we’re done with them. It’s not a very efficient method, like buying a new water bottle everytime you wanted a drink. Instead, let’s save the planet and use something over and over again. In programming, the tool we can use for this is a variable.
A variable, as it’s name implies, can change over time. This variance allows us to do all sorts of fun things not just in the moment, but by projecting into the future, and looking back to the past. We’ll look at how we can use variables in the context of our digital switches to start.
Code, as you may recall from last week, is a process of abstracting the computer’s language to a more human language. Abstracting this even further, we can break apart the computer’s process in our native tongue, then slowly transcribe this into code.
For example : “After pressing the button three times, blink the LED.”
This is a seemingly simple and straightforward thing, but there a number of discrete steps that need to be accomplished. Writing out all the steps like this is called “pseudo-code”
“Set one pin to be an input, and another to be an output. There’s a light attached to the output pin that is off to start. Create a variable to keep track of the button presses. Count the number of times the input pin is pulled high. when the pin goes high, add one to the variable’s number. When the variable equals ‘4’, turn the output on and off, and reset the variable to 0.”
While there’s a lot to unpack in there, we wind up with code that looks like this when done :
// declare global variables
int counter = 0;
int prevSwitchState = LOW;
void setup() { // configure pins
  pinMode(2, INPUT); pinMode(3, OUTPUT); // set initial pin state
  digitalWrite(3, LOW);
}
voidloop() { // read the state of the switch into a local variable:
  int currentSwitchState = digitalRead(2); // compare current switch state to the previous state
  // if it is different and the current state is HIGH
  if (currentSwitchState != prevSwitchState && currentSwitchState == HIGH) {
    // add one to the counter
    counter++;// or counter=counter+1;
  }// evaluate the number of presses
  if (counter == 4) { // blink the LED:
    digitalWrite(3, HIGH);
    delay(100);
    digitalWrite(3, LOW);
    delay(100);
    digitalWrite(3, HIGH);
    delay(100);
    digitalWrite(3, LOW);
    delay(100);
    digitalWrite(3, HIGH);
    delay(100);
    digitalWrite(3, LOW);
    delay(100);
    digitalWrite(3, HIGH);
    delay(100);
    digitalWrite(3, LOW);
    delay(100); // reset the counter
    counter = 0;
  }
  // set the last switch state to the current one
  // for the next time through the loop
  prevSwitchState = currentSwitchState;
}
}
}
There are a couple things that need to be done with variables to use them. First, you need to declare the data type (what kind is it?), initialize it (what’s it called? does it have an initial value?), then make changes (vary it).
The kinds of variables we use in Arduino are probably going to be limited to boolean, byte, int, long, & char. More often than not, you’ll be using an int. This will hold most all the information you need.
- boolean : 2 values, true or false (1 or 0) (2 bits)
- byte : 256 values (8 bits , or 1 byte)
- char : 256 values, expressed as a letter (8 bits , or 1 byte) )
- int : -32,768 to 32,767 (16-bits , or 2 bytes)
- long : -2,147,483,648 to 2,147,483,647 (32-bits or 4 bytes)
A bit is a 0 or 1. it’s the smallest unit of measurement in a computer. We string these together in a computer’s memory to make larger numbers. This binary notation (2 to the power of something) allows computers to store values larger than 0 or 1.
You declare a variable like this :
int sensorNum;
int sensorThreshold=666;
In the first instance, you’re not giving it an initial value. Arduino will give it a 0. In the second instance, you’re saying “sensorThreshold equals six-hundred-sixty-six, until the program or I tell it to change.”
The names can be anything that start with a letter and contain no spaces. They should be informative, and it’s usually helpful to camelHump them. Variables can also be used to name items like pins, so that you have easily identifiable names for things.
Variables have scope, in that some are global, and available anywhere in your program, while others are local, and can only be seen by functions in which they are declared. Global variables are declared at the top of your program. Local variables are declared inside a function or loop.
This far, we’ve worked with digital sensors, that is, things that are either on or off. While this binary system is great for computers, we live in a world that’s not quite so black and white.
The physical world exists along a spectrum, and, fortunately for us, there are a wide variety of sensors that can get information about the physical world. With some sleight of hand, we can teach computers about the world around us. We’ll address a few of the many different types of sensors in a little bit. First, how do we trick the computer?
On your Arduino, there’s a special circuit called an ADC (an analog to digital converter). This samples the voltage on pins A0-A5, allowing us to translate voltage into a numeric representation. Different microcontrollers have different sampling resolutions. The Arduino has a 10-bit resolution. This means we can get a value between 0-1023 that represents the analog voltage on the pin (1024 total steps). 0 corresponds to 0 volts, 1023 corresponds to 5v. Lucky for us, this fits neatly inside an int.
To get the value from a sensor, you call analogRead(). This takes one argument, the pin you wish to read the value from.
mySensorValue=analogRead(A0);
We can see the results of an analogRead in number of ways. To replicate what we’ve been doing with the LEDs so far, we can use this value to change the delay of our blinking light :
const int ledPin=7;// naming the ledPin. constants don't change
const int potPin=A0;// naming the input pin
int sensorVal;// holds the sensor value, also delays the blinking LED

void setup(){
    pinMode(ledPin,OUTPUT);// set the LED pin as an output
}

void loop(){
    int delayTime;// local variable to hold delay time
    sensorVal=analogRead(potPin);// read the sensor value, save it in a variable
    delayTime=sensorVal;// save the value in the local var
    digitalWrite(ledPin,HIGH);
    delay(delayTime);// delay per sensor reading
    digitalWrite(ledPin,LOW);
    delay(delayTime);// delay per sensor reading
}
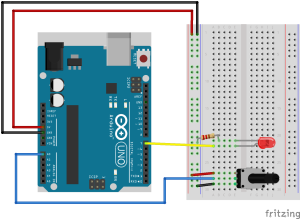
Now that we have our code, let’s look at the circuit. The LED on pin 7 should be familiar from last week. Our sensor will be connected to pin A0. The easiest thing to get started with is a potentiometer.
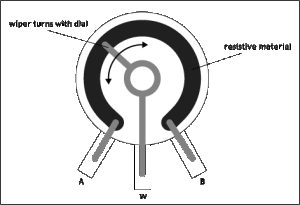
A potentiometer is a self containedvoltage divider, often appearing as a knob or slider. The inside of a slider looks like this : (many thanks to Jeff Fedderson for the image) :
The center pin acts as a wiper moving across the resistive material. The voltage coming off the center pin (the wiper) increases the further it moves away from pin A, where power is applied. We measure the voltage of the center pin on the Arduino. Potentiometers are not polarized, so A&B are interchangeable.
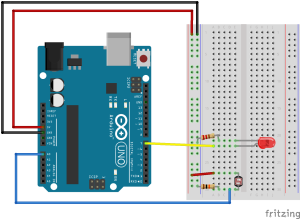
For other analog sensors (photocells, FSRs, flex sensors, etc.), you need to build a small circuit with a pulldown resistor, just like with the switch. In this case, you’re building your own voltage divider. A general rule of thumb for selecting the proper resistor value is to match the maximum sensor resistance. If you aren’t sure, start with a 10k resistor and see what your output is like.
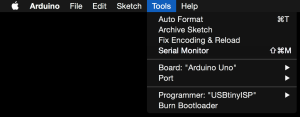
One more thing that will help you involves another new function called Serial.println() This sends information from the Arduino back to your computer. You can use the build in serial monitor to see this information. The serial monitor can be accessed through the Tools menu :
You can also access it by clicking on the magnifying glass icon on the right side of the main bar :
To start sending information serially, you must include Serial.begin() in your setup(). It takes an argument that indicates how fast it will communicate with your computer. For the time being, use 9600.
const int potPin=A0;// naming the input pin
int sensorVal;// holds the sensor value, also delays the blinking LED

void setup(){
    Serial.begin(9600);// open the serial connection at 9600 baud
}

void loop(){
    sensorVal=analogRead(potPin);// read the sensor value, save it in a variable
    Serial.println(sensorVal);// send the value of the sensor over the serial monitor
    delay(2);// slight pause for the cause
}
If you’re using a sensor that runs off of a voltage less than 5V, you will not get the full resolution of the sensor unless you call the analogReference() function and provide the Arduino with the appropriate reference voltage on the AREF pin.


