Serial communication
So far we have touched on the physical side of the world of electronics, and moved up to the idea that we can control computers with just light (via cameras)! Exciting.
What’s even more exciting is that we can use computers to communicate with one another. A good starting point for that is sending information between a microcontroller and a multimedia computer.
We’ll send some information from the Arduino to a p5js sketch, then do the reverse. Eventually we’ll have the machines doing full fledged communication with each other.
Our Arduino sketches cannot speak to the browser directly. We need to install some software which will enable communication between the two.
To start, download the latest version of the serialcontrol application from here : https://github.com/vanevery/p5.serialcontrol/releases
Install the file you downloaded while we talk about other things.
Once you’ve got that settled, download this file and unzip it : https://github.com/vanevery/p5.serialport/archive/master.zip
make note of where you have saved/unzipped it
Making a thing talk
We can re-use some of our earlier Arduino sketches to communicate with the browser. Let’s revisit the analog output sketch we did many days ago :
/*Reads an analog input pin, maps the result to a range from 0 to 255
  and prints the results to the serial monitor.
  The circuit: * potentiometer connected to analog pin 0.
  Center pin of the potentiometer goes to the analog pin.
  side pins of the potentiometer go to +5V and ground

  This example code is in the public domain.*/

// These constants won't change. They're used to give names
// to the pins used:
const int analogInPin = A0;
// Analog input pin that the potentiometer is attached to
int sensorValue = 0; // value read from the pot
int outputValue = 0; // value output to the PWM (analog out)

void setup() {
  // initialize serial communications at 9600 bps:
  Serial.begin(9600);
}

void loop() {
  // read the analog in value:
  sensorValue = analogRead(analogInPin);
  // map it to the range of the analog out:
  outputValue = map(sensorValue, 0, 1023, 0, 255);
  // print the results to the serial monitor:
  Serial.write(outputValue);
  // wait a millisecondsbefore the next loop
  // for the analog-to-digital converter to settle
  // after the last reading:
  delay(1);
}
The circuit will look like this :

Let’s open up the serial monitor.
Full of gibberish, right? We’ll explain that in a moment (pro tip ; it has to do with the difference between Serial.print and Serial.write)
For now, let’s be happy that it’s sending information.
To work with the p5 side, we have to do alot more:
- Import the P5JS serialport Library
- Make a Serial Object
- Find the Right USB port in the Setup Function and make a serial object.
- Make a Callback Function to Listen to Incoming Messages
- profit!!!! (that’s actually number 4)
The serial port library can’t access your serial ports directly. It needs to communicate with a local server (that you started with node).
Now, we need to identify which serial port the computer is communicating to the Arduino with. The setup here is more complicated than the Arduino code. You’ve seen the port names in your Arduino IDE already. But COM3 or /dev/cu.usbmodem1421 aren’t the easiest things to recall. This sample code will print out all the serial devices attached to your computer.
var serial;// variable to hold an instance of the serialport library
function setup(){
    serial=new p5.SerialPort();// make a new instance of the serialport library
    serial.on('list',printList);// set a callback function for the serialport list event
    serial.list();// list the serial ports
}

// get the list of ports:
function printList(portList){// portList is an array of serial port names
    for(var i=0;i<portList.length;i++){// Display the list the console:
        println(i + " " +portList[i]);
    }
}
the console will have the name of your microcontroller!
Javascript relies on events _and _callbacks. Eevnts are generated by your operating system when something happens (like a mouse click or serial port opening, or serial data arriving). Your sketch has callback functions that respond to that event. the p5.serialport library can listen for the following events :
- list : the program asks for a list of ports.
- connected: when the sketch connects to a webSocket-to-serial server
- open :a serial port is opened
- close : a serial port is closed
- data : new data arrives in a serial port
- error : something goes wrong.
you set a callback function before you call it like this :
var serial;// variable to hold instance of serialport library
var portName='/dev/cu.usbmodem1421';// your serial port name

function setup(){
    serial=newp5.SerialPort();// make a new instance of the serialport library
    serial.on('list',printList);// set a callback function for the serialport list event
    serial.on('connected',serverConnected);// callback for connecting to the server
    serial.on('open',portOpen);// callback for the port opening
    serial.on('data',serialEvent);// callback for when new data arrives
    serial.on('error',serialError);// callback for errors
    serial.on('close',portClose);// callback for the port closing
    serial.list();// list the serial ports
    serial.open(portName);// open a serial port
}
now create a couple functions to do stuff :
function serverConnected(){
    println('connected to server.');
}

function portOpen(){
    println('the serial port opened.')
}

function serialEvent(){
    var inByte = serial.read();
    println('I got some data!' + inByte);
}

function serialError(err){
    println('Something went wrong with the serial port. '+err);
}

function portClose(){
    println('The serial port closed.');
}
We don’t need all of these for data, but they are helpful. serialEvent processes incoming data. If we made a global variable and passed it the information from serial.read(), we’d have a means of passing data from the arduino to our sketch.
Now if we wanted to pass data from the arduino to a sketch, we can do this :
var serial;// variable to hold the serialport library
var portName='/dev/cu.usbmodem1421';// use your serial port name
var inByte=0;
var xPos=0;

function setup(){
    createCanvas(400,300);
    background(0);
    serial=newp5.SerialPort(); // make a new instance of the serialport library
    //serial.on('list', printList);    // set a callback function for the serialport list event
    serial.on('connected',serverConnected);// callback for connecting to the server
    serial.on('open',portOpen);// callback for the port opening
    serial.on('data',serialEvent);// callback for when new data arrives
    serial.on('error',serialError);// callback for errors
    serial.on('close',portClose);// callback for the port closing
    serial.open(portName);// open a serial port
}

function draw(){
    // background(0);
    fill(0);
    rect(0,0,width,40);
    fill(255);
    text("sensor value: "+inByte,30,30);
    stroke(127,34,255);
    line(xPos,height,xPos,height-inByte);// at the edge of the screen, go back to the beginning:
    if(xPos>=width){
            xPos=0;
            background(0);
        } else {// increment the horizontal position:
            xPos++;
    }
}

function serverConnected(){
    println('connected to server.');
}

function portOpen(){
    println('the serial port opened.');
}

function serialEvent(){
    inByte=Number(serial.read());
    print(inByte);
}

function serialError(err){
    println('Something went wrong with the serial port. '+ err);
}

function portClose(){
    println('The serial port closed.');
}
Awesome! We should see a graph of our sensor!
Here’s a small sketch to control a servo Motor serially with the Arduino :
#include <Servo.h>      // include the servo library
Servo servoMotor;// creates an instance of the servo object to control a servo

void setup(){
    Serial.begin(9600);// initialize serial communications
    servoMotor.attach(2);// attaches the servo on pin 2 to the servo object
}

void loop(){
    if(Serial.available()>0){
        int input=Serial.read();//this waits for byte from P5
        int servoAngle=map(input,0,255,0,179);
        // Servo can only go from 0-179 degrees, map incoming values to those angles
        servoMotor.write(servoAngle);// move the servo using the angle from the sensor:
        Serial.write(servoAngle);// write back to P5 what angle the servo is at.
        delay(15);// wait for a moment!
    }
}
and here’s the p5 sketch for that :
var serial;
var portName='/dev/cu.usbmodem1421';// your serial port goes here
var mpos=0;
var inByte;

function setup(){
    createCanvas(600,400);
    serial=newp5.SerialPort();// make a new instance of the serialport library
    serial.on('list',printList);// set a callback function for the serialport list event
    serial.on('connected',serverConnected);// callback for connecting to the server
    serial.on('open',portOpen);// callback for the port opening
    serial.on('data',serialEvent);// callback for when new data arrives
    serial.on('error',serialError);// callback for errors
    serial.on('close',portClose);// callback for the port closing
    serial.open(portName);// open a serial port
}

function draw(){
    background(0);
    fill(255);
    ellipse(mouseX,height/2,20,20);
    textSize(36);
    text("Outgoing number: "+mpos,20,height-60);
    text("Servo Angle: "+inByte,20,height-20);
}

function mouseDragged(){
    mpos=ceil(map(mouseX,0,width,0,255));
    mpos=constrain(mpos,0,255);
    serial.write(mpos);
}

function serialError(err){
    println('Something went wrong with the serial port. '+err);
}

function portClose(){
    println('The serial port closed.');
}

function printList(portList){
    for(var i=0;i<portList.length;i++){
        println(i+" "+portList[i]);
    }
}

function serialEvent(){
    inByte=Number(serial.read());// stores the data from the Arduino
}

function serverConnected(){
    println('connected to server.');
}

function portOpen(){
    println('the serial port opened.')
}
Serial.write is easy, but Serial.println() is more useful.
Let’s change the Arduino code to this :
void setup(){
    Serial.begin(9600);
}

void loop(){
    int reading=analogRead(A0);
    Serial.println(reading);
    delay(1);
}
Now we can see the values in the serial monitor!
Let’s make a small change to our p5 sketch to make it compatible with this change.
ASCII allows us to do more with the same characters!
var serial; // variable to hold  the serialport library
var portName = '/dev/cu.usbmodem1421'; // use your serial port name
var inByte = 0;

var xPos = 0;

function setup() {

  createCanvas(400, 512);
  background(0);
  serial = new p5.SerialPort(); // make a new instance of the serialport library
  //serial.on('list', printList);  // set a callback function for the serialport list event
  serial.on('connected', serverConnected); // callback for connecting to the server
  serial.on('open', portOpen); // callback for the port opening
  serial.on('data', serialEvent); // callback for when new data arrives
  serial.on('error', serialError); // callback for errors
  serial.on('close', portClose); // callback for the port closing

  serial.open(portName); // open a serial port
}

function draw() {
  // background(0);
  fill(0);
  rect(0, 0, width, 40);
  fill(255);
  text("sensor value: " + inByte, 30, 30);
  stroke(127, 34, 255);
  line(xPos, height, xPos, height - inByte/2);

  // at the edge of the screen, go back to the beginning:
  if (xPos >= width) {
    xPos = 0;
    background(0);
  } else {
    // increment the horizontal position:
    xPos++;
  }
}

function serialEvent() {
  var inString = serial.readStringUntil('\r\n'); // hold info in the buffer until you see the control characters, and store that in our inString variable
  inString = inString.trim();
  if (inString.length > 0) { //if we have any information, use it!
    inByte = Number(inString);
    print(inByte);
  }
}

function serverConnected() {
  println('connected to server.');
}

function portOpen() {
  println('the serial port opened.')
}

function serialError(err) {
  println('Something went wrong with the serial port. ' + err);
}

function portClose() {
  println('The serial port closed.');
}
a slight digression into how 32 == the space bar, and 27 == the escape key.
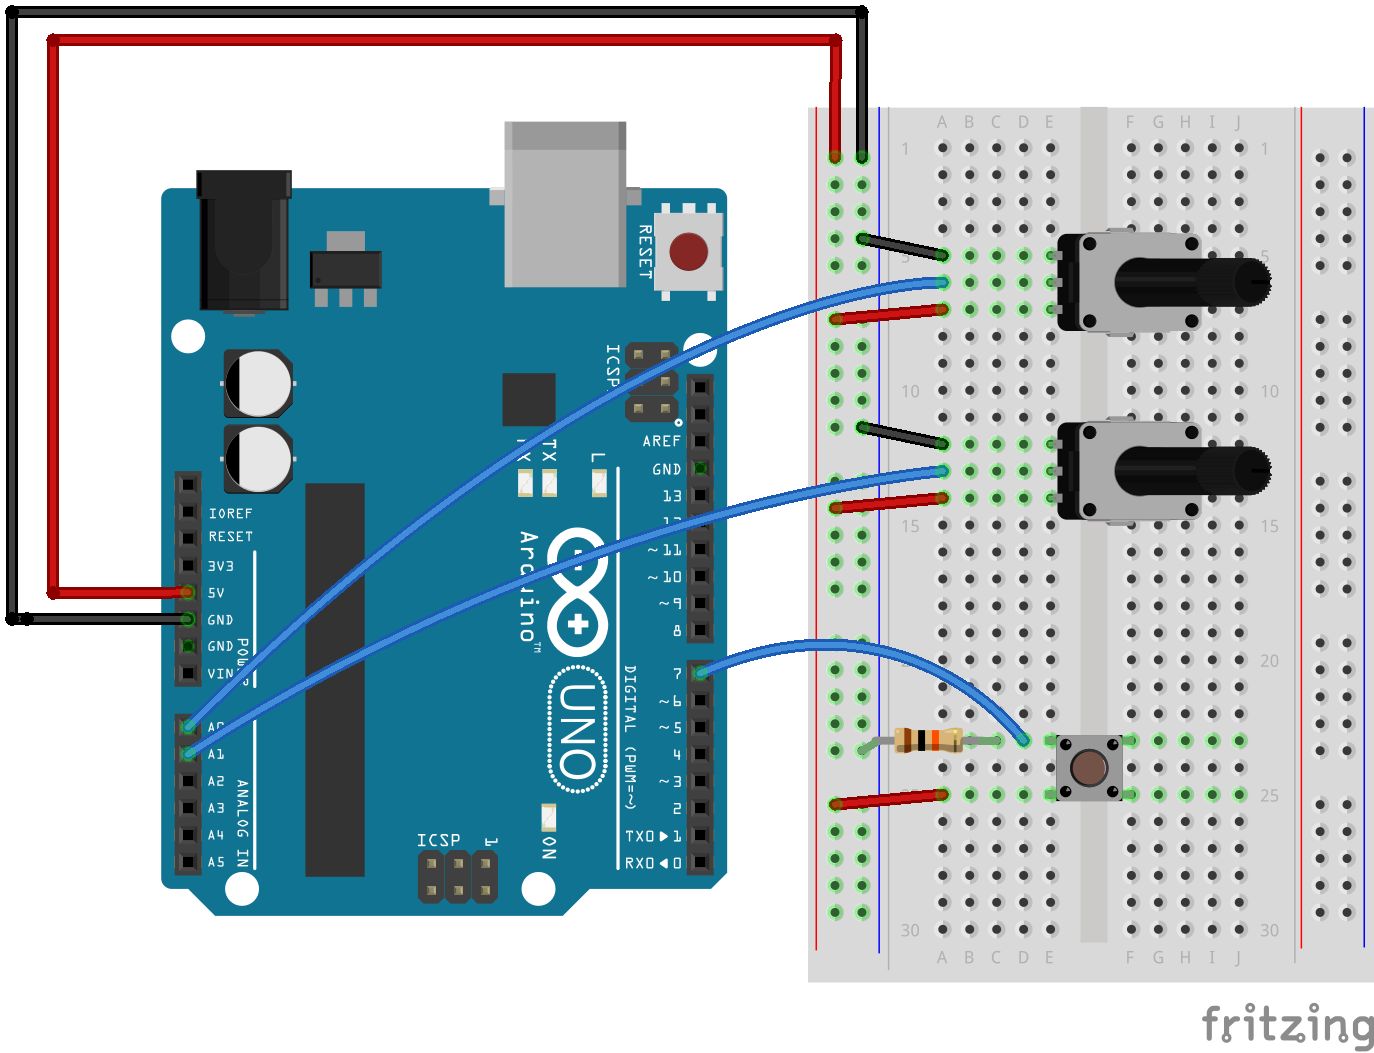
The call and response method of exchanging data is a reliable and effective way you can communicate between machines. Here’s an Arduino layout and program that waits for a byte before it sends data to a p5.js sketch. there's a switch connected to pin 7, and 2 pots or other analog sensors, connected to A0 and A1.
void setup() {
  Serial.begin(9600);
  pinMode(7, INPUT);

  while (Serial.available() <= 0) {
    Serial.println("hello");
    delay(300);
  }
}

void loop() {
  if (Serial.available() > 0) {
    int inByte = Serial.read();
    //we did it to slow things down for synchronization
    //notice we didn't even put the number in anything

    int pot1 = analogRead(A0);
    int pot2 = analogRead(A1);
    int button = digitalRead(7);
    Serial.print(pot1);  //notice I did not say println
    Serial.print(",");
    Serial.print(pot2);
    Serial.print(","); //using the comma as a delimiter
    Serial.println(button);
  }
}
And the associated js code
var serial; // variable to hold an instance of the serialport library
var portName = '/dev/cu.usbmodem1421'; // fill in your serial port name here
var xPos = 0;
var yPos = 0; // y location of the circle
var circleColor = 255; // color of the circle

function setup() {
 createCanvas(640, 480); // make canvas
 background(0); // black background
 serial = new p5.SerialPort(); // make a new instance of the serialport library
 serial.on('list', printList); // set a callback function for the serialport list event
 serial.on('connected', serverConnected); // callback for connecting to the server
 serial.on('open', portOpen); // callback for the port opening
 serial.on('data', serialEvent); // callback for when new data arrives
 serial.on('error', serialError); // callback for errors
 serial.on('close', portClose); // callback for the port closing

 serial.list(); // list the serial ports
 serial.open(portName); // open a serial port
}


function draw(){
 background(255, 255, 0);
 fill(circleColor); // fill depends on the button
 ellipse(xPos, yPos, 50, 50); // draw the circle
 print("circle color: " + circleColor);
}


function serialEvent() {
 // read a string from the serial port
 // until you get carriage return and newline:
 var inString = serial.readStringUntil('\r\n');

 //check to see that there's actually a string there:

 if (inString.length > 0) {

 if (inString !== "hello") {

 inString = inString.trim(); // get rid of whitepace

 var sensors = split(inString, ','); // split the string on the commas

 if (sensors.length > 1) { // if there are more than 1 element
  yPos = map(Number(sensors[0]), 0, 1023, 0, height); // element 0 is the ypos
  xPos = map(Number(sensors[1]), 0, 1023, 0, width); // element 1 is the xPos
  circleColor = 255 - (Number(sensors[2]) * 255); // element 2 is the button
  }
 }
 serial.write('x');
 }
}

function serialError(err) {
 println('Something went wrong with the serial port. ' + err);
}

function portClose() {
 println('The serial port closed.');
}

function printList(portList) {
 for (var i = 0; i < portList.length; i++) {
 println(i + " " + portList[i]);
 }
}

function serverConnected() {
 println('connected to server.');
}

function portOpen() {
 println('the serial port opened.')
}